Monday, December 24, 2012

Jesus' Birthday Cake


We started this Christmas tradition last year.  Now that we have the blog, I thought it's a great opportunity to share this very special recipe and tradition during this season and reflect in our home what the real meaning of Christmas is. 

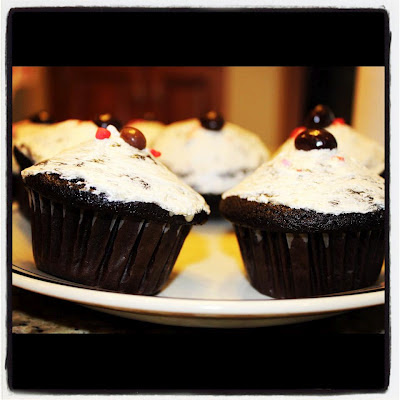
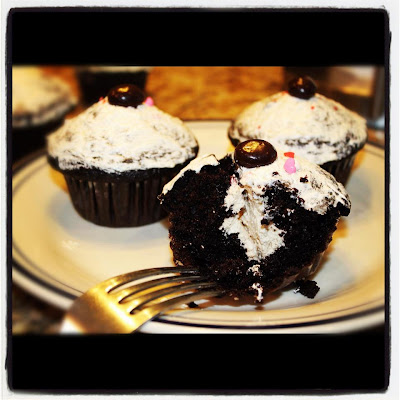
This cake is called "Chocolate Frangipan".  It's a mix of almond paste and cocoa, a match made in heaven!  We light one candle in the middle of the cake and sing happy birthday to Jesus.  Why I picked this cake for Jesus' birthday?  Simply because it has the right shape and colors that signifies its meaning....

* The shape of the cake is round to represent the world into which Jesus was born.
* The bottom layer is black to represent the sin in us, which is why Jesus came to the earth.
* The red coloring is Jesus' blood that was shed on the cross for our sin.
* The pure white frosting is the purity and righteousness of Christ.
* The red candle (not shown on picture) represents Jesus who came into the dark world to bring light and truth to all who are willing to receive it.


Ingredients

1 7oz box Odense almond paste, grated
1/2 cup sugar
1 stick soft butter
3 large eggs, room temperature
6 tablespoons flour
6 tablespoons cocoa powder (dutch processed preferred)
raspberries or cherries, garnish
ready made white frosting

For chocolate Ganache Glaze (optional):

4 oz bittersweet chocolate, cut into small pieces
2 tablespoons heavy cream
2 tablespoons butter

Tools:

9 or 10 inch tart pan with removable bottom or springform pan
box grater
electric mixer
piping bag


Directions

To make the cake:  Preheat oven to 350 degrees F.  Grease and flour the tart pan.  Add the almond paste to a mixing bowl with sugar and butter.  Mix on low speed until combined.  Beat on high until smooth, about 3 minutes.  Add eggs one at a time beating well between each addition.  Scrape bowl down and beat on high until light and fluffy.  Mix flour and cocoa and fold into the batter until just combined.  Spread batter evenly into pan.  Bake for 25 minutes or until a toothpick inserted between the center and edge comes out clean.  The middle will still be soft.  It will firm as it cools.  Cool on a wire rack.

To make the glaze:  Bring water to a simmer in the bottom of a double boiler.  Put cream, butter, and chocolate pieces in the top of double boiler.  Stir until melted together.  Do not let any water touch mixture.  Pour warm glaze over cake and smooth to edges.   Pipe with white frosting and garnish with raspberries or cherries.


Recipe courtesy: Odense

Thursday, December 13, 2012

L'Americain

Well, May is off to Mississippi to celebrate big'sis' birthday, so I finally find myself back in the kitchen this week-end...  On the menu, a throwback to my student days in France...

Called an "Americain" this sandwich was a staple of my diet when I was a high-school teen in France.  Sold in what would amounts to a food truck, I would find my favorite "Americain" at a food truck across from the main post office in Forbach, France.  It is so good, and so easy to make...  An "Americain" is a twist on the french version of the hamburger.  Served on a baguette instead of a bun, this sandwich is topped/stuffed with French fries...  You can eat the fries first, then the sandwich, or may I suggest eating just enough fries to be able to close the bread, and eat the others as part of the sandwich...


Recipe (makes 3 generous sandwiches):


Ingredients:
1 - Baguette, aka French bread
3 - Burger patties
3 - Baking potatoes
Ketchup, mustard, mayo
Optional: lettuce leaf and sliced tomato.

Preparation:
Use the diameter of the beef patty to figure out where to cut out the baguette.  Ideally, each section of baguette should be about as long as twice the diameter of that beef patty.

Slice lengthwise halfway through each baguette section so that you can first remove the "mie" (fluffy white portion inside the crust).  You can then line the inside of the bread with ketchup, mustard and mayo to taste.  Line with lettuce and tomato to make it a "Americain Royal."

Hand cut your potatoes into fairly skinny fries, almost "shoe-string" like.  One potato should be enough for 1 serving.   In vegetable oil, fry the fries until golden brown.

While the potatoes cook, prepare your hamburger patty cooking them to taste.

You are finally ready to complete your sandwich.  Cut the cooked patties in half, and place each half-moon patty side by side inside the sandwich, and top generously with fries.  Top the fries with mayo and Voila! You are ready to eat an Americain like a Frenchman (or woman)! Bon Appetit!

Monday, December 10, 2012

Swedish Meatballs

As the sun goes down and the temperature plummets in the Midwest, we indulge in this delicious, comforting dish which makes a great compliment to the stillness of the cold night at dinnertime.  We like to pair the dish with warm garlic bread right out of the oven.  If you're like little Sweetpea you'll have your meatballs "sans-sauce," as she'd rather eat her meatballs as is, by itself and it truly is scrumptious.  Otherwise, drizzle the silky cream sauce over it with steamed rice (like me who eats everything with rice), pasta (like papa), or boiled new potatoes; they all are the perfect accompaniments to this dish.  This is one of our go-to dishes that always bring comfort in our family, Swedish style!


Ingredients

2 slices white bread, torn into pieces
3/4 pound ground beef
3/4 pound ground pork
1/4 cup milk
1 small onion, minced
1 egg
1/4 teaspoon ground allspice
1/4 teaspoon onion powder
1/4 teaspoon garlic powder
1/4 teaspoon ground nutmeg
salt and pepper, to taste
2 tablespoons unsalted butter
1/4 cup all purpose flour
2 cups low sodium beef broth
1/4 cup heavy cream


Soak bread into the bowl with milk.  Set aside.  In a small saucepan, heat 1 tablespoon butter over medium heat.  Add onions until soft.  Remove from heat and set aside.

In a large bowl, mix bread with onions, meat, egg, salt, pepper, all spice, nutmeg, onion powder and garlic powder.  Mix them thoroughly until smooth.  If you have an electric mixer, you may do so, if not, mix it thoroughly with hands.  Shape them into golf ball sizes.  Heat remaining butter in a skillet over medium heat.  Pan fry the meatballs (not overcrowding the pan) in batches, browning all sides.  Keep cooked meatballs in an over-proof dish and keep warn in the oven at 200 degrees.

When all meatballs are done, turn heat to med-low and add flour to the pan.  Whisk until lightly browned.  Slowly add the beef stock and whisking at the same time until sauce begins to thicken.  Add the cream, season with salt and pepper to taste, and continue to cook until gravy reaches the desired consistency.  Remove the meatballs from the oven, place few of them on top of your pasta or rice, drizzle sauce all over it.  Enjoy!


Yield: 6-8 servings

Wednesday, November 14, 2012

Pork Adobo


Another basic, simple, yet flavorful Filipino dish that I tried recreating over the years using different techniques.  Somehow, I never made it "perfect" to my liking until this last one.  I did a complete different method this time and the result was spot on!  Ok, I'm not trying to boast proclaiming I make the best "Pork Adobo" but I let my dear husband be the judge.  This man, who is a pizza-lover by nature obviously will prefer to eat pizza in a heartbeat over anything else (well, that's what I thought) but historically picked my pork adobo for dinner?   Yes.  Needless to say, I was flabbergasted.  Why on earth would he do that?  Simply because "they are soooo gooood!", according to him and couldn't stop raving about it.  And I have to agree with him.  It's by far my best pork adobo I've made.   Other than its goodness, the best part about it is that you can control the consistency of its sauce to your liking.  The sauce itself is so good that it's best drizzled over hot steamed white rice.  In our family, cooking is an art and discovery, and it should be fun.  Many times they turn out great, many times they turn out okay, or sometimes even worse.  But we never give up, we keep cooking and trying new things for as long as we breathe and eat.  This time though, I have to say it's one of our best!   


Ingredients

3 pounds pork shoulder or butt (cut in bite-sizes)
2/3 cup apple cider vinegar
salt and freshly ground pepper, to taste
4 tablespoons low sodium soy sauce
5 cloves garlic, minced
2 bay leaves
1 cup water
3 tablespoons extra virgin olive oil


Combine all ingredients in a pot (except olive oil) and let it marinate for 1 hour or overnight.  Cover, and let it simmer in low heat for about an hour (or until meat is tender).  Spoon out meat in a bowl, save sauce in a separate bowl.

Heat oil in medium high in a frying pan.  Brown meat on all sides, making sure not to cramp them altogether, doing in batches.  Place in serving dish.  Put reserved sauce into the pan, gently scraping off the brown bits on the pan.  Let the sauce cook for 2-3 minutes.  The longer it cooks the less runnier it will be depending on your preference, your choice.  Note, the sauce makes really good accompaniment to the white steamed rice.  Pour sauce over your rice and voila!  Enjoy your best adobo!


Yield:  5-8 servings

Note:  You can cut this recipe in half for smaller portion.

Sunday, November 4, 2012

French Onion Soup


Ooh la la....french onion soup!  It's one of our family's repertoire dishes during this time of the year.  Yep, it's that time to take those hidden ramekins out because this soup can't be done without those.  They are individually divided into those tiny ramekins, topped with toasted bread and cheese and put under the broiler for few minutes to perfect its beauty.  I've decided to incorporate two different cheeses on this recipe for the topping (thanks to Auntie Jane's wonderful suggestion).  It really added a whole new dynamic to the soup.  The long cooking time is very important here, also.  It gives the ingredients time to express themselves into the soup and I'm telling ya', the end result is ah-mazing!


Ingredients:

3 tablespoons olive oil
3 Vidalia onions, sliced
1/2 teaspoon kosher salt
1/2 teaspoon freshly ground black pepper
1 teaspoon fresh thyme leaves or 1/2 teaspoon dried thyme leaves
4 cups beef broth
1/4 cup dry white wine
ciabatta or baguette bread, cubed and toasted (about 4 slices)
2 tablespoons shredded parmesan cheese
4 ounces fontina cheese, sliced
4 ounces gruyere cheese, sliced
Special equipment: 4 (1 1/2 cup) ovenproof ramekins


Preheat oven to 400 degrees.  Slice bread into cubes, spread on cookie sheet, sprinkled with parmesan cheese.  Toast bread in the oven for 10 minutes or until brown.  Set aside.

In a medium saucepan, heat the olive oil over medium heat.  Add onions, salt and pepper.  Reduce the temperature to low heat.  Cook onions, stirring occasionally, until onions are tender, about 1 hour or longer.  Slow cooking is the key to this recipe.  When onions are tender, add white wine to deglaze the pan, then add thyme and broth.  Simmer, uncovered, for about 15 minutes.

Divide the soup between the 4 ramekins.  Divided the cubed bread among the ramekins.  Top each with slices of cheeses.  Place under the broiler, until the cheese is golden and bubbly, about 4 minutes.  Serve immediately!


Yield:  4 servings

Sunday, October 21, 2012

Vanilla Turtle Rootbeer Floats


Three letters to describe this treat..."OMG!"  I don't even know where to start.  This float is divinely scrumptious!  Rootbeer float is me and Sweetpea's all time favorite afternoon treat, be at home or when out and about.  This homemade rootbeer float is beyond comparison to what's out there, at least to the ones we've tried.  The turtle ice cream takes this float to a higher notch!  It's not just a simple sweet frothy thing, but the mixture of chocolate bits and pecans give a surprise crunch on every sip.  I enjoy and love sharing sweet things with my daughter, either food or a moment of togetherness.  My favorite part of enjoying this treat is at home.  It's like a delightful summer afternoon routine of ours.  Few days a week, on mid-afternoons, we both look forward to our "cuddle time", which means in our household is popping a movie in (Megamind to be exact, her favorite movie last summer and I swear we watched it a hundred times), cozying up on the sofa and sipping this frothy sweet treat!  I know summer has past already however, we still do make them every now and then when the demands of our palates arise.  Honestly, it's becoming a sweet tradition of ours and will be wonderfully reminisced by us in the future.


Ingredients:

1 pint vanilla turtle ice cream (our favorite) or any vanilla chocolate chip ice cream
1 liter root beer
whipped cream
shaved chocolate, to garnish

Fill four glasses with scoops of ice cream.  Pour the rootbeer over the ice cream.  Top with whipped cream and shaved chocolate.  Serve with straws and long spoons.  Enjoy!


Yield: 4 servings


Thursday, October 18, 2012

Budbud (Sticky Rice)


These beauties are about to steam for 30 minutes
It's ready to be enjoyed.  Get your hot chocolate ready.
Lovingly open it and enjoy the fruit of your labor!


Budbud is a glutinous rice cooked in coconut milk, then gently wrapped in a wilted banana leaves and steamed to perfection.  This is very popular all over the islands of Philippines.  It is best served for breakfast or afternoon snack (merienda) paired with hot chocolate on the side.  There are several different versions of making Budbud depending upon regions.  This specific recipe I made is the most popular one in the Visayan region, where I came from. 
When I was shopping at our one and only Asian store in our tiny town, I inadvertently found some frozen banana leaves.  It's fascinating how little things like banana leaves can make your day.  It's funny that we have so much banana trees at home (Philippines) in our backyard and I never paid too much attention to the value of it until I had to pay one at the store.  Now, seeing one here (leaves) is like a little girl seeing a beautiful doll!  It literally brought me some excitement simply because they are so hard to find in our area.  As soon as I saw the leaves, I already knew what I was going to do.  Yep, make some budbud.  So, here it is...simple, delicate and delectable!


Ingredients:

3 cups glutinous/sticky rice (washed and drained)
5 cups coconut milk
1/2 cup sugar
1 teaspoon salt
banana leaves (cleaned and wilted, I put them individually under the broiler for few minutes making sure not to burn just long enough to wilt it)


Stove top method:

Mix coconut milk, sugar and salt in a saucepan.  Add washed and thoroughly drained rice.  Cook the mixture in medium heat.  Stir constantly for 15 to 20 minutes.  When mixture is soft and liquid is reducing, stir to prevent rice from sticking at the bottom of the pan.  Lower heat until rice is fully cooked and all liquid dissipated.  Take off from heat.  Put 3 tablespoons of cooked budbud on a wilted banana leaf (about 6 inches long), fold over the edges and tie extra thin leaves on each ends.  Repeat the process.  Put them on steamer for 30 minutes.  Let it cool a bit, enjoy with hot chocolate!


Note:  You can also use a rice cooker (thank you vhayotch for the wonderful suggestion!) for a very convenient version.  Put all ingredients into the cooker.  Make sure you put it to the sweet rice setting (if your rice cooker has that option).  Once it's done, you may notice some extra liquid on top of the rice (like what I had) but don't panic, just stir them gently into the rice and it'll do the trick.  Proceed to step 2 and 3, which is wrapping and steaming.  Enjoy!

Tips:  Freeze leftovers in an air tight ziplock bags.  Reheat in the microwave on a plate for 1 minute before serving.


Yield:  makes 20 wrapped budbud

Wednesday, October 10, 2012

Pork Sinigang


I'm sure all my Filipino friends have tried, and can relate to this food.  Pork Sinigang is boiled pork meat, tastes like a little tangy or sourish kind of soup, simmered for hours until tender along with vegetables in it.  It's one of our native Filipino dishes.  Every time I make this, it always bring me back home...my fond memories growing up...with my mom served it smoking hot in a big bowl pile of meat and vegetables with hot steamed rice next to it while we (siblings) gathered around the long rectangular table for dinner.  Coming from a big family, the dinner table was always our perfect spot (hang out) every mealtime to get everybody together.  I still vividly remember our Dad wouldn't start our meal if one of his children was missing.  He made sure everybody is present, proceed to "thanksgiving prayer", then the digging begins! Oh, how I miss those moments enjoying the simple things in life with family members, it's simply priceless!  Other than the obvious reason as to why I'm so attached to this dish, it's also very comforting and good most perfect for cold weather here that even Andre and Sweetpea are its biggest fans! 


Ingredients:

2 pounds pork belly or pork ribs (but into bite-size pieces)
1 bunch green leaves (spinach, lettuce, bokchoy or cabbage), chopped
3 tablespoons fish sauce
1/2 bunch green beans or string beans (I make string beans optional as they're hard to find in our area), cut into 2 inch length
2 pieces medium size tomato, sliced
3 pieces chili (banana pepper), optional
1 tablespoon cooking oil
2 liters water
1 large onion, sliced
1 teaspoon fresh ginger, sliced
1/2 to 1 pack sinigang mix or tamarind soup base (use accordingly to your taste preference), can be found at Asian stores

Heat oil in a deep pot at medium heat.  Saute onions until soft.  Add ginger, then pork and cook until light brown.  Add fish sauce and mix, add the water and let it boil.  Add tomatoes, let it boil then turn heat down and simmer for 1 hour, or until pork is tender.  Put in sinigang mix and chili (if using), mix thoroughly.  You can gradually add sinigang mix into it to make sure you get your desired taste of sourness and not overdo it (remember, you can always add more but cannot eliminate it).  Finally, add the green/string beans, cabbage, bokchoy heads (if using), simmer for 5 minutes.  Add the other green leaves that wilts easily, as soon as it boils again, cover the pot, turn it off and remove from the heat.  The remaining heat from the pot will continue cooking the leaves by itself.  Serve hot and enjoy!


Friday, October 5, 2012

Alcoholic Hot Chocolate


Ah, the beauty of autumn!  My favorite season of the year is finally here!  There's something about autumn that brings warmth and comfort from the ever beautiful changing colors of nature to the cozy, snugly weather...it's breathtaking and relaxing!  And of course, there's these array of scrumptious comfort foods that goes with it.  One of our favorite things to do in this kind of weather is turn the fireplace on, snuggle on the couch with dear hubby and little sweetpea and drink some hot chocolate!  That's right, hot chocolate!  If you love this kind of weather and love hot chocolate, this one is for you.  This has been the most requested drink in the Lacour household during this season, be it daytime or nighttime.  Every time I think of fireplace I think of hot chocolate!  It's like they're married together,  one won't be complete without the other.  You can make this kid friendly by omitting the alcohol, which I do during daytime so sweetpea can also enjoy. 


Ingredients:

2 cups milk
3 1/2 oz. best quality dark chocolate, bittersweet or semisweet, as preferred
1 cinnamon stick
2 teaspoons honey
1 teaspoon brown sugar
1 teaspoon vanilla extract
2 tablespoons dark rum, or to taste (optional)


Put milk in the saucepan and break the chocolate into pieces and add to the milk along with a cinnamon stick, honey and sugar, and heat gently until the chocolate is melted.  Add the vanilla and mix with a small and whisk and still whisking, add a spoonful of the rum first and taste to see if you want more.  Add more sugar if you want this sweeter, too.  Take out the cinnamon stick and pour into 2 cups.  Enjoy!


Yield: 2 servings
Recipe courtesy: FoodNetwork, Nigella Lawson

Friday, September 28, 2012

Litson Manok (Roasted Chicken)


In Visayan, we call it Litson Manok, but it's commonly known as Lechon Manok in vast areas in Philippines.  This dish is very popular in our country.  You get to see them beautifully skewered and cooked before your eyes in big rotisserie in front of most Pinoy restaurants or diners.  When I was home few months ago, I had the opportunity to indulged them countless times.  Now, I'm back here in the US and my palate has been calling for the taste of it.  Preparing this chicken is almost the same as if you're roasting a whole chicken, except for few key steps and ingredients that are so vital to get the special flavor that this chicken stands out.  It requires marination for several hours, or best if left overnight in the fridge to get the maximum taste being submerged in the liquid marinade.  In here, I use two Cornish game hens.  They are smaller than regular chickens, hormone-free and cage-free.  It's just the kind of chicken we, as a family choose to consume.   However, you can use any regular whole chicken you may have.  I chose to put them in the oven instead in a rotisserie simply because I have two of them and my rotisserie is not quite big enough for them.  While baking them, the aroma of the lemon grass wonderfully fills the air in the entire house that it gives me such great anticipation for my meal to get my hands to that delectable chicken...yum!  Back home, this is best served with steamed rice and dipping sauce (2 tablespoons soy sauce + 1 tablespoon white vinegar, with small chili peppers *optional), or Mang Tomas Lechon sauce (can be found at some Asian grocery store).


Ingredients

1 2-3 pounds whole chicken, or 2 small Cornish game hens
1 8oz. sprite or 7up
1/4 cup soy sauce
3 tablespoons brown sugar
5 cloves garlic, minced
1 small size yellow onion, sliced
1 lemon, juiced
1 tablespoon fresh ginger, sliced
1 to 2 stalks of lemon grass (tanglad)
2 bay leaves
2 tablespoons extra virgin olive oil or butter
salt and freshly ground pepper


Mix Sprite or 7up, soy sauce, lemon juice, garlic, ginger, onions, pepper and sugar.  Add whole chicken.  If cooking on the same day, marinade the chicken for an hour or more, otherwise let it set in the fridge for overnight to get the best result, turning the chicken occasionally making sure to adhere all areas of the chicken to the marinade.

Preheat oven to 375 degrees F.  Stuffed the chicken cavity with lemon grass (tied together), garlic, bay leaves, peppers, some onion slices from the marinade.  Inject some of the marinade unto the inside of the chicken.  Rub chicken with olive oil, sprinkle liberally with salt and freshly ground black pepper.  Roast the chicken for 1 hour or until the chicken is golden brown and internal temperature reads 165 degrees F, and juices run clear.  If the skin burns quickly before chicken is done, loosely cover the chicken with an aluminum foil.  Take out of heat, let it rest for 10 minutes before serving.  Wash hands (the way we, Filipinos eat this chicken) and enjoy with your favorite dipping sauce!


Tip:  When roasting whole poultry, tuck the tips of the wings at the back of the breast to avoid burning.


*Recipe inspiration is from  Panlasang  Pinoy, with Sweetpea's slight modifications to suit our palate.

Monday, September 24, 2012

Pancit Canton Guisado


I have to confess, I have attempted making this dish several times before and not even once I ever got it perfect until today!  Okay, I exaggerated a bit but maybe almost perfect, I should say.   There are many different versions of making this dish.  The array of ingredients that you can use are endless!  In here, I integrated what I had in hand from pork meat (you can use chicken, or both) to carrots, cabbage and onions.  But you can definitely add more veggies like green beans, bell peppers or celery.  I think this recipe is spot on to my taste.  I use dried Canton noodles that I found at some Asian grocer.  My trick is cooking the noodles separately according to the box, then set it aside until ready to use.  I love making this dish for a number of reasons, it brings me back so much memories from home, and it's my hubby and daughter's favorite kind of noodles too!  I made this today and melted my heart seeing little Sweetpea having a big smile on her face as she saw it on the table for lunch coming home from school.  One of the reasons I get inspired to cook for my family simply because I know they appreciate it (regardless of my cooking skills, whether it turns out good or not), but when your little one wholeheartedly thanked you and say, "Mama, you're a good cooker!"(that's her grammar and I thought it's cute!)...that is enough for me to hear and put a smile on my face, too!


Ingredients:

1 pound dried Canton noodles (found in Asian grocery store)
1 pound pork or chicken, or a combination of both, cut into bite-sizes
2 cups green cabbage, chopped
2 medium sized organic carrots, thinly sliced
1 small yellow onion, thinly sliced
1/4 cup low-sodium soy sauce
1 tablespoon sherry cooking wine
1 tablespoon oyster sauce
2 tablespoons extra virgin olive oil
salt and pepper, to taste
lemon wedges, to garnish (optional)


Cook canton noodles according to package instruction.  Set aside.

Heat oil in a wok on medium high heat.  Add meat until lightly browned.  Add onions and sherry wine.  Cook for few minutes until onions become soft.  Add soy sauce, oyster sauce, salt and pepper.  Cook for another 5 minutes.  You might lower the heat to medium on this stage.  If it starts to dry up, do not hesitate to add a little bit of water, if necessary.   Adjust the flavor accordingly with a sprinkle of salt or a dash of soy sauce until you reach your desired taste.  Add carrots and cabbage, saute for few minutes until tender but not mushy.  Put in canton noodles, and mix gently with the rest, adjust the taste.  Take off from heat.  Squeeze a lemon wedge on a serving plate.  Enjoy!

Tuesday, September 18, 2012

Lemon Chicken Breast


One word for this baked chicken..."impressive!"  It was getting closer towards the end of the day and I still had no clue on what to cook for dinner.  The only meat I thawed out was a whole chicken.  I have several good chicken recipes but sometimes it's nice to explore something new.  Although time was ticking on me, I literally was not willing to give in to my old recipes.  After few minutes of recipe searching, here I was in the kitchen island butchering the whole chicken into serving pieces.  This recipe calls for chicken breasts but I had to work on what I had on hand.  To your convenience, by all means go ahead purchase the cut up ones if you can.  It makes life so much easier, unless you find doing the dirty job quite enjoyable (not me!).  This recipe turned out impressively good!  Both of my kiddos enjoyed to the last bite.  Chicken was so moist and tender in the inside with crispy skin on the outside (Sweetpea's favorite part of the chicken!) with a hint of garlic and lemon flavor that Andre liked.  But my personal favorite was the sauce that I drizzled over steamed rice....oh em gee!  I was scraping the sauce off the pan to the last drop!


Ingredients:

1/4 cup good olive oil
3 tablespoons minced garlic
1/3 cup dry white wine
1 tablespoon grated lemon zest
2 tablespoons freshly squeezed lemon juice
1 1/2 teaspoons dried oregano
1 teaspoon minced fresh thyme leaves, or 1/2 teaspoon dried thyme
kosher salt and freshly ground black pepper
4 boneless chicken breasts, skin on
1 lemon


Preheat the oven to 400 degress.

Warm the olive oil in a small saucepan over medium-low heat, add the garlic, and cook for just 1 minute but don't allow the garlic to turn brown.  Off the heat, add the white wine, lemon zest, lemon juice, oregano, thyme, and 1 teaspoon salt and pour into a baking dish.

Pat chicken breasts dry and place them skin side up over the sauce.  Brush the chicken breasts with olive oil and sprinkle them liberally with salt and pepper.  Cut the lemon in wedges and tuck in among the pieces of chicken.

Bake for 30 to 40 minutes, depending on the size of the chicken, until the chicken is done and skin is lightly browned.  If the chicken isn't browned enough, put it under the broiler for 2 minutes.  Cover the pan tightly with aluminum foil and allow to rest for 10 minutes.  Serve hot with the pan juices. 

*I drizzle the pan juices over hot steamed rice...it's oh so good!!!


Yield: 4 servings
Recipe courtesy:  Foodnetwork, Barefoot Contessa

Thursday, September 13, 2012

Chocolate Cupcake with Coffee-Cream Filling

Recipe makes about 24 cupcakes.  These are about to go in the hot oven!

This step, cupcakes are already baked, cooled and individually filled with delicious coffee-cream filling.  The sprinkles on top are Sweetpea's work and idea.  I gave her that little pleasure of enjoyment being my souz chez :) 

So, here it is... the frosting plays a big role!  I cheated on this one though, I cut the frosting recipe in half due to the butter and sugar that's called for, and spread thinly on 24 cupcakes.  Same great taste except less sugar and fats!  Honestly, we all deserve to indulge a little bit on the sweet side every once in a while, aren't we?

As you can see, the inside shows the coffee-cream filling that is finger-lickin' good!!!  Hands down...the best cupcake I've ever tasted...and made thus far!

So, here it is...one of our guilty pleasures!  After weeks of begging...and begging...I finally gave in to my dear hubby's requests.  I made these cupcakes specially for him of which he's been craving for in a long time.  I have to admit, this is not a quick recipe.  There are three steps into it which are baking, filling and frosting.  But I tell ya'...the work and the wait are soooo worth it!!!  You know why he loves this so much?  It's because it has his three favorite ingredients in the world....chocolate, coffee and kahlua.  If you're like him, then yes, you get to enjoy every bit of your bite into this little piece of heavenly, delightful cupcake!  Here's how it sums up, the cupcake itself is mixed with cocoa and coffee, the filling is made of Kahlua liquor and cream cheese, and the frosting is mixed with coffee, then garnished with chocolate-covered coffee bean!  Oh boy, if you are caffeine sensitive like me, you might as well avoid indulging them in the evening...I know I tried but it's difficult to abstain from these chocolatey delights.  Oh well, we all deserve some sweet indulgence every once in a while, aren't we?


Special equipments needed:
*piping bag or squeeze bottle with long narrow tip
*electric mixer


Ingredients:

2 1/4 cups all-purpose flour
2 cups sugar
3/4 cup unsweetened cocoa powder
1 1/2 teaspoons baking soda
1 teaspoon baking powder
1/2 teaspoon salt
1 cup vegetable oil
1 cup strong brewed coffee, cooled
3 large eggs
1 (8-ounce) container sour cream
1 teaspoon vanilla extract
Coffee Cream Filling, recipe follows
Coffee Buttercream, recipe follows
Chocolate covered coffee beans, for garnish, optional

Coffee Buttercream Frosting: (I cut this recipe in half and spread thinly on 24 cupcakes)
1/2 cup butter, softened
3 cups confectioners’ sugar
1/4 cup strong brewed coffee

Coffee Cream Filling:
1 (3-ounce) package cream cheese, softened
1/4 cup coffee-flavored liqueur
1 (8-ounce) container frozen chocolate flavored whipped topping, thawed


Preheat the oven to 350 degrees F. Line muffin pans with paper liners and set aside.
In a large bowl, whisk flour, sugar, cocoa powder, baking soda, baking powder, and salt. Add oil, coffee, and eggs. Beat at medium speed with an electric mixer until smooth. Mix in the sour cream and vanilla.
Spoon the batter evenly into prepared muffin cups, filling each 2/3 full. Bake until a tester inserted in center comes out clean, for 16 to 18 minutes. Let them cool in pans on wire racks for 5 minutes. Remove from the pans and cool completely on wire racks.
Spoon Coffee Cream Filling into a squeeze bottle with a long narrow tip. Insert the tip into the top of cupcake and squeeze about 1 tablespoon of filling into center of each cupcake.
Spread the Coffee Butter cream frosting evenly over the cupcakes and garnish with chocolate covered coffee beans, if desired.


Coffee Cream Filling:
In a small bowl, whip the cream cheese at medium speed with an electric mixer until smooth. Slowly add the liqueur and fold in the whipped topping. Cover and chill.
Yield: 1 1/4 cups


Coffee Buttercream Frosting:
In a medium bowl, beat the butter at medium speed with an electric mixer until creamy. Gradually add the confectioners’ sugar, beating until smooth, then beat in the coffee.
Yield: 2 1/2 cups

Yield: 24-30 cupcakes
Recipe courtesy: Paula Deen

Wednesday, September 12, 2012

Slow Cooker Pot Roast


This is another working person's recipe.  Very quick and easy, delicious pot roast.  And in our household, a pot roast won't be compete without some crunchy steamed asparagus on the side.  This green, skinny, stick-like veggie happens to be our family's favorite!  We prefer them steamed, simple and healthy, and has a little bit crunch to it.  There are no perfect rules for the vegetables in this recipe.  Add any veggies you may wish, as many as you want.  Yet, the gravy is another winner, more so, a time saver.  Make some pasta or mashed potatoes alongside topped with the pot roast sauce, you'll have an instant gravy for a perfect delicious meal!


1 (10.75 oz) can condensed cream of mushroom soup
1 (0.5 oz) dry onion soup mix
3/4 cups water or beef broth
2 1/2 to 3 pounds pot roast
1 tablespoon extra virgin olive oil
organic carrots, sliced
button mushrooms, quartered

Heat pan in medium high with olive oil.  Sear meat on all sides.  In a slow cooker, mix cream of mushroom soup, dry onion soup mix and water or broth.  Place pot roast, carrots and mushrooms in slow cooker and coat with soup mixture.  Cook on high setting for 3-4 hours, or on low setting for 8-9 hours.  Enjoy!


Yield:  5-6 servings

Recipe adaptation:  Allrecipes

Thursday, September 6, 2012

Easy Curried Chicken Breast


This is my first time making chicken curry.  It's absolutely yummy!  This is a lovely, lemon-colored dish with nice and creamy gravy that is perfect over a bed of steamed rice.  You can add any vegetables you want but the recipe below is what I had in the fridge, which is by the way, a good way to use up what ever veggies you have in the house.  Super easy, another method of making it is simmering on the stove top but on here, I found the crockpot method as the easiest for my time and convenience.  Crockpot is my bestfriend during hectic days when I don't have much time to hang out in the kitchen.  Days when my daughter has school, gymnastics class, ballet class, running errands in town, etc.  I put everything in the crockpot, let it do its cooking, and by the end of the day all I want is to sit back, relax and have some yummy, wholesome, comfort food for dinner.  This dish is definitely perfect for it!


4 boneless chicken breast, sliced in two and seasoned with salt and pepper, to taste
1 large yellow onion, sliced
2 garlic cloves, minced
1 tablespoon extra virgin olive oil
1 (10 3/4 oz.) cream of chicken soup
2 organic carrots, julienne
1 red bell pepper, chopped
1/2 cup frozen green peas
1/2 cup white wine or water
1 teaspoon turmeric
1 teaspoon curry powder

In a large skillet, heat extra virgin olive oil.  Saute onions and garlic until soft, then remove from pan.  Add more oil to pan if needed and brown chicken on both sides.  Put all ingredients, including chicken breasts and sauteed onions in the crock pot, cover and set to low heat for 6-8 hours or high heat for 4-5 hours, or until chicken is cooked and tender.


Yield: 8 servings

Recipe courtesy: Food.com

Friday, August 31, 2012

Grilled Marinated Swordfish and Pesto Pasta


Oh em gee...these are beautiful! *drool*
Pick your weapon...and dig in!


Pesto.  Yummy pesto!  Other than its loaded nutrients, we are impressed by it's versatility and deliciousness bringing a boring dish (pasta particularly) to a new level of goodness!  We try to keep pesto in our fridge at all times.  We just don't know when we need them, especially during busy days.  Once in a while we settle for store-bought jarred pesto, but most of any given time we make our own.  There's nothing compares to the fresh ones!  Last year, Sweetpea and I planted basil in the pots.  We delightfully had a lot of usage to it, from salad to pesto.  The next summer, we planted cilantro.  This is where I researched what other good use we can do to it other than incorporating in Mexican dishes.  Andre and I love cilantro so much that making a pesto out of it is such a genius idea.  I usually make tons of them that I segregate the leftovers into small servings, put in ziplock bags and freeze them.  Anytime I need them, just grab a pack, defrost and mix into a hot pasta and voila!  you'll get an instant pesto pasta!

In this case, we perfectly paired it with wild-caught swordfish steaks.  Swordfish is sort of a meaty, firm fish.  It has almost the same texture as tuna, to my opinion.  Grilling or pan-frying is a good option to cook them.  The marinade of the dish was just divine!  Serve along with homemade cilantro pesto pasta and some leftover white wine, it was a lovely meal that we truly enjoyed! 


Grilled Marinated Swordfish

4 cloves garlic
1/3 cup white wine
1/4 cup lemon juice
2 tablespoons soy sauce
2 tablespoons olive oil
1 tablespoon poultry seasoning
1/4 teaspoon salt
1/8 teaspoon pepper
4 swordfish steaks
1 tablespoon chopped fresh parsley (optional)
4 slices lemon, for garnish (optional)


In a glass baking dish, combine the garlic, white wine, lemon juice, soy sauce, olive oil, poultry seasoning, salt and pepper.  Mix just to blend.  Place swordfish steaks into the marinade, and refrigerate for 1 hour, turning frequently.  

Option 1: Preheat an outdoor grill for high heat and lightly oil the grate.  Lightly sprinkle swordfish with salt and pepper on both sides.  Grill swordfish steaks for 5 to 6 minutes on each side. Garnish with parsley and lemon wedges.  Serve with cilantro pesto pasta alongside.

Option 2: Preheat oven to 400 degrees.  Heat oil in heavy large ovenproof skillet over medium-high heat.  Lightly sprinkle swordfish with salt and pepper on both sides.  Add swordfish to skillet.  Cook until browned, about 3 minutes.  Turn swordfish over and transfer to oven.  Roast until just cooked through, about 10 minutes longer.  Transfer swordfish to plates.  Garnish with parsley and lemon wedges.  Serve with cilantro pesto pasta alongside. 


Cilantro Pesto Pasta 
*I try to make the pesto ahead of time, store in a tight container and refrigerate.

1 cup packed fresh cilantro leaves
1/2 cup almonds
3 large garlic cloves
1/4 cup grated parmesan cheese
1/4 cup extra virgin olive oil
1/2 salt

Combine the cilantro, garlic and almonds in a blender or food processor and puree until smooth.  Add the parmesan , oil and salt. and puree to a smooth paste.  Stir into hot pasta and serve.


Yield: 4 servings (both recipes)

Grilled Marinated Swordfish recipe courtesy:  Allrecipes.com, MIKE T 007
Cilantro Pesto recipe courtesy: Food.com, Dragonshoes


Wednesday, August 29, 2012

Arugula and Prosciutto Pizza

First, follow the pizza crust (of your choice) instruction box.  Lightly brush pizza crust with olive oil, ladle pizza sauce on top (starting from the middle and work your way out leaving 1/2 an inch crust on the edges).  Next, spread mozzarella cheese all over the top, add slices of red onions and mushrooms.  Bake to perfection (refer to baking instruction box)!

So, here it is!  Once pizza is done, slice into wedges and put on your plate topped with seasoned arugula and prosciutto...enjoy!


Here we go...another super easy, delicious pizza recipe!  Every so often my dear hubby would request pizza for dinner.   If you're like me, there are occasions that I just don't feel like doing all the work  making homemade dough and pizza sauce from scratch (although they're the best!) simply because   it's one of my so-called "lazy days".   So, to my collection of "lazy recipes" I depend, and this is one of them.  I should call this "Lazy Pizza", right?  But no, because I think it deserves a lot of respect due to its goodness and somewhat nutritious (compared to typical pizza toppings).  If you have all the time to make homemade dough and sauce to go with it, I would suggest do so otherwise, go for this one.  I opted to use the store-bought pizza crust (thin) and jarred pizza sauce.  This may not be your typical pizza by the looks of it, but the combination of the arugula, its woodsy taste with a little spice and the saltiness of prosciutto meat is such a wonderful marriage of flavor!  Like I said, it's super easy...super fast...and super good!  Even little Sweetpea can do it!


Ingredients:

1 Mama Mary's pre-baked pizza crust (we prefer thin)
1 small jar pizza sauce 
mushrooms, thinly sliced
red onions, thinly sliced
1 cup cubed or shredded fresh mozzarella
prosciutto, very thin slices
2 cups fresh arugula
2 tablespoons extra virgin oil
1 teaspoon sherry vinegar
salt and pepper to taste


Heat oven to 450 degrees.  

Mix together arugula, 1 tablespoon extra virgin olive oil and sherry vinegar.  Add salt and pepper, to taste.

Lightly brush pizza crust with 1 tablespoon extra virgin olive oil.  Spread sauce (about 1/2 cup for us, depending how saucy you want for your pizza) on the crust starting in the middle and work your way out using a spoon or spatula, leaving 1/2 inch on the edges.  Spread the cheese.  Lower oven temperature to 425 degrees, bake in the middle section of the oven until crust looks golden brown and crispy, about 8 to 10 minutes.  When done, take pizza out of the oven, slice into wedges, arrange on your plate, put arugula mixture on top, and garnish with thin slices of prosciutto (I'd say, 1 prosciutto per slice).   Enjoy!

Monday, August 27, 2012

Pasta with Sausage, Peas & Mushrooms


If you know our family very well, we unapologetically consume a lot of rice (almost every other meal, to be honest).  I have to admit, I feel a sense of guilt at times for feeding my family too much grains, although my little Sweetpea does not really complain for the fact that she also has acquired the same taste bud as her Mama but as to hubby, it's a different story.  He has not eaten that much rice in his entire existence until we got married.  So, in fairness to him, i sporadically make him pasta dishes (out of guilt, mostly) as his "treat"(as what he calls it), and this particular one is one of them!

I tried the original version of this dish using the farfalle pasta countless times.  Unfortunately, there's something about farfalle and me that are not quite simpatico (although, hubby loves it), so the last time I made it, I literally substituted spaghetti noodles to suit the dish to my liking.  To our surprise, what a difference it made...it's like bringing a good dish to another notch!  The three of us really enjoyed it a lot!  We even split the leftovers the next day.  A warm baked baguette and some green salad would be a perfect combo to go with it.  That's the beauty of home cooking, you get to play, change a bit, adjust the recipe to meet your palate's needs.  Hope you enjoy!


Ingredients:

1/4 or more of extra virgin olive oil
1 pound turkey sausage or sweet pork sausage (our preference), casings removed
kosher salt and freshly ground black pepper
10 oz. cremini or button mushrooms, coarsely chopped
1 (10 oz.) package frozen peas, slightly defrosted
1 pound spaghetti noodles (our preference) or farfalle pasta
1/2 cup grated parmesan cheese


In a large pot, bring 6 quarts of salted water to a boil.

In a large saute pan over high heat, add 2 tablespoons olive oil. Season sausage with salt and pepper.  Add sausage and saute, breaking any large lumps until golden brown.  Add a drizzle of olive oil if pan is getting dry, add chopped mushrooms and season with salt and pepper.  Saute until all the liquid from the mushrooms has evaporated, about 5 minutes or longer.  Add the peas and saute for 4 minutes.  Remove from heat and set aside.

When the pot of water has come to a boil.  Add pasta and cook until al dente (follow pasta box's cooking time instructions).  Drain in a colander.  Add pasta to sauteed sausage.  Combine thoroughly and gently cook over medium heat for few minutes more until pasta is completely cooked to your liking and fully incorporated with the sausage.  Drizzle in remaining olive oil.  If it gets too dry don't hesitate to add more oil, if necessary.  Check the seasoning.  Turn off the heat and add the grated cheese.  Stir well and serve in a large bowl.


Yield: 4 servings

*Recipe adapted from Foodnetwork, Giada de Laurentiis with our miniscule changes to suit our taste buds.

Friday, August 24, 2012

Mahi mahi + Salad Fixings + Homemade Asian Dressing


Ok, so there are no rules for the salad.  You pick the veggies of your choice.  However, we recommend adding mandarin oranges (we prefer using fresh ones over canned).  Give it a try and you'll know why...

The best homemade salad dressing ever!

We opt to a deconstructed salad over mix...yet, how ever you prefer the choice is yours.  Drizzle over a spoonful or more of the homemade dressing and enjoy your beautiful creation!


Friday.  There's something about friday that brings excitement to most of us.  Either it's the last work day of the week (if you work on weekdays) or what ever reason it may be....for us, friday (in the evening, particularly) means time for relaxation, the beginning of family bonding time that resonates throughout the whole weekend, or even party time (to others).  Thinking through the previous days how hard my dear hubby worked all week long,  I wanted to create something 'special' to put on the dinner table when he comes home.  I know he would request for something healthy (if I'd ask him) so I decided to make this meal that has all the elements that I knew he would savor and enjoy.  I wanted him to look forward to come home, kick off those shoes, unwind and enjoy some good homemade dinner with his loved ones!
This meal was very easy, very nutritious, so colorful...and did I say, flavorful?  My gosh...Yes!!!  Serve it with your favorite wine on the side this dish has the whole package that will pamper your guests from their first bite to last.  So funny that hubby and I actually found ourselves constantly uttering "hmmm..." as we voraciously savor the 'goodness' from our plates.   The mahi mahi steaks were marinated (same dressing) and grilled to perfection,  paired with your favorite vegetable salad, drizzled with this HOMEMADE asian salad dressing...I tell ya', it's out of this world!  This salad dressing is a Killer.  Yes, I have to admit I couldn't stop dipping my fingers in the jar for taste test (well, that's my excuse) because it was so finger-licken' good!!!  
Needless to say, our little family had enjoyed this beautiful meal very much.  By the end of the evening, there's this wonderful feeling of bliss and satisfaction knowing I've accomplished something ...a smile and a little 'thank yous!' from daddy and daughter melted a wife and a mother's heart.  What a great way to start the weekend!


Ingredients:

Mahi mahi steaks or fillets
Salad mix
Homemade salad dressing 


For the dressing:

3 cloves garlic, minced
2 tablespoons fresh ginger
1 green onion, chopped
1/2  lime, juiced
3 tablespoons honey
1/2 cup sesame oil
1/4 cup olive oil
1/4 cup soy sauce
1/4 rice vinegar


Mix everything in the blender/food processor, turn it on until smooth and voila!...you just made yourself a delicious homemade dressing!

Take about 1/2 cup of your dressing and put it in a ziplock bag along with your mahi mahi.  Zip it up, put in the fridge for about an hour or longer.  Be sure to refrigerate the rest of your dressing in a tight container.

When ready for dinner, apply some cooking oil or spray to your grill prior to grilling the fish to avoid sticking.  Heat the grill to medium high or high.  Grill mahi mahi for 5-10 minutes per side, flipping the steaks or fillets when color starts to turn white.

Grab yourself a plate of salad, drizzle with your homemade dressing (depending on how much dressing you like on it), display your beautiful grilled mahi mahi on top, grab a glass of your favorite wine and enjoy every single bite of it!


Recipe courtesy: Mommiecooks


Thursday, August 23, 2012

Saute-steamed Bok Choy


One of the desired changes that Andre and I were making in our diet is as much as possible incorporating colors into our daily meals, like fruits and vegetables.  Unfortunately, he is more of a picky-eater than me when it comes to veggies.  So getting a variety of greens other than the usual suspects is quite of a challenge. On the other hand, it gives me the opportunity to be creative and resourceful to come up with something palatable for the kids.  This side dish, however, got a two thumbs up from him (yay!).  It's deliciously Asian inspired.   It's scary, that I can just eat the whole pan of it, thank goodness it's veggies! 


Ingredients:

1 pound bok choy
1 clove garlic, minced
1 tablespoon grated fresh ginger
1 tablespoon extra virgin olive oil
2 tablespoons water
1 teaspoon reduced sodium soy sauce
dash of ground black pepper
1 teaspoon dark sesame oil

Cut 1 inch off the bottom of the bok choy and separate the stems and leaves.  Cut the stems and leaves into small bite-size pieces.  In a large pan saute the garlic and ginger in the olive oil for a minute over medium heat.  Add the bok choy stems (they take longer) and saute for 3-5 minutes more.  Add the leaves and water, and cook another 6 minutes, stirring occasionally.  Season to taste with soy sauce and pepper.  Stir in the sesame oil and serve while hot.

Yield: 4 servings

Recipe courtesy: SparkRecipes, Ladyphoenix61

Monday, August 20, 2012

Sauteed Bitter Melon (Ginisang Ampalaya)


Every time my husband will go on his business trips for few days, I take the opportunity of cooking some very exotic Filipino dishes.  Honestly, I appreciate for his interest and eagerness to try new foods from my culture as some of them don't look as appetizing (not to scare you) but the thing is, only taking the bravery of trying out (or out of curiosity) with the unfamiliar is what makes us explore and discover better things.  Although, he loves most of my Filipino foods but this particular one is not one of them.   But one day, he will, I hope.  So, what I made today is called Ginisang Ampalaya, also known as Sauteed Bitter Melon.  It's very easy and simple.  Rhetorically, the dish has a bitter taste but not to be alarmed because the process of making the dish helps lessen the bitterness of the melon and being sauteed with other spices give balance to the flavor.   I like what Ray says on his blog, "either you love it...or hate it!" and it's true.  Growing up, I strongly disliked this dish simply because I never got used to the bitterness that I thought eating them would be torture...but as I got older the taste had slowly acquired in my palate.   However, to my surprise though, my little Sweetpea also joined digging into my plate as I was having them for meal...made me a very happy Mama!  


Ingredients
 
3/4 lb Ground Pork or Ground Turkey (about 340 grams)
2 medium Bitter Melons
1/2 small Onion – sliced to 1/4 inch strips
5 cloves Garlic – finely minced
1 medium Tomato – diced
4 eggs – beaten
1/2 cup Chicken Broth
1 Tablespoon Oyster Sauce
2 tablespoon Oil
Salt and Pepper to taste

Cut bitter melon in half – lengthwise.  Remove the seeds by scraping them with a spoon.  Slice bitter melon to 1/4 inch thick.  In a bowl, place sliced bitter melon in 3 cups of lukewarm water, add 2 tablespoon salt then set aside for about 20 minutes. This process with lessen the bitterness of the bitter melon.

After 20 minutes, transfer bitter melon in a colander to drain.  Place colander under a running water.  Wring the sliced melons several times to get rid of the salt.  After the last wring, set bitter melon aside in a bowl.

Place wok or large pan over medium-high heat then add oil.  When the oil is hot, Add garlic, and tomato.  Stir fry until tomatoes are soft and almost mashed.  Add ground meat.  Stir fry until meat is golden brown.  Add oyster sauce and chicken broth.  Stir until it boils.  Lower heat to medium.  Add the sliced onions and bitter melons.  Stir for 2 minutes.  Set all the ingredients to the side of the wok.  Add beaten eggs in the middle of the wok.  Stir until softly scrambled.  Stir in all the ingredients back until fully combined with the eggs.  Add salt and pepper to taste.  Serve hot with rice.

Recipe courtesy:  Wok with Ray

Thursday, August 16, 2012

Crunchy Parmesan Chicken Tenders


We choose to serve this with rice simply because that's the way we are!
You cannot omit this sauce for this dish.  Without it, you'll be lost!


This dish claimed a special spot in our regular monthly menu.  Three reasons: it's super easy, super healthy and last but not least, super yummy.  But I have to warn that if you omit making the sauce you will be disappointed.  Italian style, these chicken tenders are perfectly paired with balsamic vinegar sauce.  It reminds me of marriage 'til death do us part', it won't be complete without the sauce...it definitely has a very important role when you indulge them. With the mild, subtle flavor of the chicken dipped into the sweet, tangy taste of the balsamic sauce makes this dish a happy marriage!  In our household, we enjoy having them with plain steamed rice, salad or veggies on the side.  Great for appetizer or serve as an entree, it's your choice!


Ingredients:

4 tablespoons plus 1/2 cup extra-virgin olive oil
1 cup buttermilk
1 1/2 pounds chicken tenders (about 18)
3 large garlic cloves, minced
1/2 teaspoon salt
3 tablespoons balsamic vinegar
Freshly ground black pepper
1 1/4 cups freshly grated parmesan
3/4 cup Italian-style seasoned bread crumbs


Preheat the oven to 500 degrees F.
Brush 1 tablespoon of oil over each of 2 heavy large lined baking sheets. Place the buttermilk in a large bowl. Add the chicken tenders and stir to coat. Let stand at least 15 minutes and up to 30 minutes.
Meanwhile, mash the garlic with the salt in a medium bowl. Whisk in the vinegar and then the remaining 1/2 cup of oil. Season the vinaigrette, to taste, with pepper. Transfer the vinaigrette to a small serving bowl.
Stir the Parmesan and bread crumbs in a pie dish. Remove the chicken tenders from the buttermilk and dredge them in the bread crumb mixture to coat completely, pressing to adhere. Arrange the coated chicken tenders on the prepared baking sheets, spacing evenly. Drizzle the remaining 2 tablespoons of oil over the chicken tenders and bake until they are cooked through and golden brown, about 12 minutes.
Transfer the chicken tenders to a platter and serve the vinaigrette alongside for dipping.
 
Yield: 6 servings

Recipe courtesy:  Giada de Laurentiis, Foodnetwork.com


Tuesday, August 14, 2012

Brown Butter Madeleines

"Oh madeleines, how scrumptious you are!"  This is our little Sweetpea's famous line every time she munches on these little delectable things!  A Lacour's favorite at home and on the go (and we go a lot!).  This is her most requested homemade snack.  These are very easy and fun to make that even little Sweetpea can help.  Originated in France, a very popular pastry, great for the "quatre heure" traditional afternoon snack, these little heavenly delights are somewhat little sponge cakes, airy and buttery molded in beautiful, tiny individual shapes.


Sweetpea gets fascinated watching the mixer incorporating all ingredients.  As sous chef, her job is adding the dry ingredients into it.  She loves being given responsibilities in the kitchen!
Carefully pour enough mix into each molds.
So, this is her favorite part...decorating!  I let her have fun with it.  In fact, this is her idea to put sprinkles on top...and I thought it's a great idea!


The beautiful finished product!  Some with sprinkles and some without...hmm, I already knew which one she will first dig into...
After having them cooled off in open air, I store them in a container with cover to help prolong freshness for days.


Ingredients:

1/2 cup unsalted butter
2 eggs
1/3 cup sugar
Nice drizzle of honey (1 to 2 teaspoons)
2/3 cup flour
1/2 teaspoon baking powder
Salt
1/2 orange, zested
Special equipment: madeleine mold*
Sprinkles (optional)


Preheat the oven to 400 degrees F.
To brown the butter, melt the butter over medium heat in a heavy saucepan, allowing to bubble and foam, stirring frequently. Once the foaming subsides, allow the butter to brown along the bottom and then remove the pan from the heat. Browning will take about 5 minutes total; do not burn.
In a medium bowl, mix the eggs, sugar, and honey with electric mixer until thick and pale. Add the browned butter and mix.
In a small bowl, sift together the flour, baking powder and 1/4 teaspoon salt, and mix into liquid ingredients, along with zest, just until blended.
Fill the greased madeleine baking molds and bake until golden, 9 to 11 minutes.
*Cook's Note: you may substitute a mini-muffin pan for madeleine molds.

Yield: 10-14 madeleines

Recipe courtesy:  Melissa d'Arabian, Foodnetwork.com